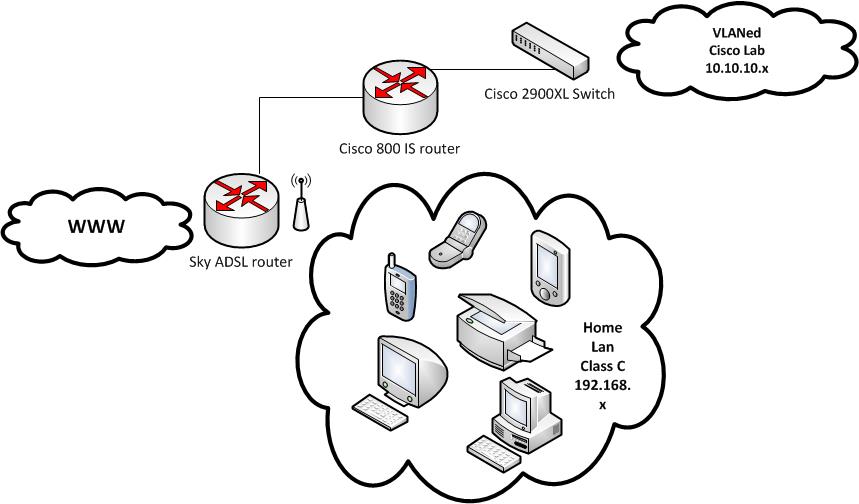
Setting up DHCP on a Cisco router
![]()
It’s relatively straight forward to set up DHCP on a Cisco router. The first step is to ensure the DHCP service works & is running on the router, usually by default, it is;
router# configure terminal
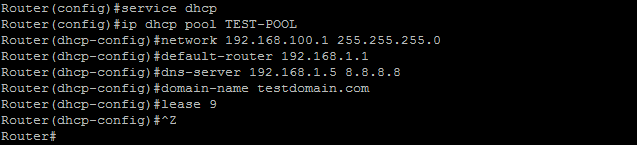
router(config)# service dhcp
The next step is to create the DHCP pool that defines the network of IP addresses that will be given out to the clients. Note that ‘TEST-POOL’ is the name of the DHCP IP Pool we are creating:
router(config)# ip dhcp pool TEST-POOL
router(dhcp-config)# network 192.168.100.1 255.255.255.0
The above sets a Class C scope starting at 192.168.100.1 – 254. On Cisco routers, you handle exclusions later. So now we need to define some granular parameters that will be given to each client, these include a default gateway (default-router) dns servers, domain and lease period (in days);
router(dhcp-config)# default-router 192.168.1.1
router(dhcp-config)# dns-server 192.168.1.5 8.8.8.8
router(dhcp-config)# domain-name testdomain.com
router(dhcp-config)# lease 9
So now we’ve set up some standard parameters, we now need to set some exclusions. Drop back to ‘global configuration mode’ and do the following;
router(config)# ip dhcp excluded-address 192.168.1.1 192.168.1.5
router(config)# ip dhcp excluded-address 192.168.1.10
What I’m showing above is you can set IPs seperated by a space on the same line, or you can enter line by line. In the example above, we’ve reserved the IP’s we’ve specified earlier when we were setting up the main parameters.
If you want to see which clients are being serviced by DHCP you can use the command;
router# show ip dhcp binding